Why Is There a Blue and Green Circle on My Samsung Chromebook Screen
Chrome Accessibility Features for the Classroom
All About Chromebook Accessibility Features
Chromebooks are fast and simple devices for the classroom, but are they a good option for learners with special needs?
How do Chromebook accessibility features compare with iPad accessibility features, text-to-speech tools, or screen readers available on Windows devices?
What accessibility options are available on a Chromebook?
Google's mission is to organize the world's information and make it accessible to everyone, including individuals with disabilities.
"Everyone should be able to access and enjoy the web. We're committed to making that a reality." – The Google Accessibility team (@GoogleAccess)
The Google Accessibility team has made significant improvements to the accessibility features for Chromebooks. Features like ChromeVox (screen reader), Select-to-speak (Text to speech), Dictation (voice typing) help students and adults navigate and interact with the web.
I am not a special education or adaptive technology expert, but I have had many students in my classroom with IEPs and various learning challenges. I also work with lots of subject area teachers in the same situation.
This Chromebook accessibility guide will give you simple, clear explanations of each Chromebook accessibility feature and suggest ways that you can use them to help students overcome learning barriers.
It is our duty as educators to do whatever we can to eliminate barriers to student learning. Understanding the accessibility features available on a Chromebook is a great place to start!
You might be surprised!
While these Chromebook accessibility features were created individuals with visual impairments, reading disabilities, or physical impairments, they have some creative applications that can benefit everyone!
As I tested and experimented with these Chromebook accessibility features I discovered that many of them are incredibly useful when presenting to a large group of students or adults.
Features like Screen zoom, "highlight mouse cursor" and dictation are wonderful for technology teachers and trainers!
Don't limit your use of Chromebook accessibility features to students with learning needs! Everyone can benefit!
Chromebook Accessibility Apps and Extensions
This post focuses exclusively on the built-in Chromebook accessibility features.
There are some helpful Chrome apps and extensions that offer even more support for students with special learning needs. But for now, we'll just be looking at the built-in accessibility features for Chromebooks.
Let's get started!
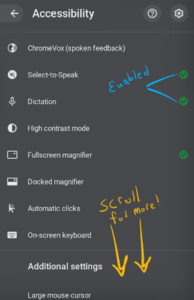
How to enable accessibility features on a Chromebook
Accessibility features are turned off by default on a Chromebook. The first thing you will want to do is turn them on so that they can be easily accessed through the system menu where you typically log out, connect to wifi, etc.
How to enable accessibility feature on a Chromebook:
- Click on the "snowman" at the top right corner of the Chrome browser and select "settings"
- On the settings page, search for "accessibility"
- Look for the option that says "Always show accessibility options in the system menu" and turn the switch on.
- That's it! The accessibility features are now easily accessible in the system menu at the bottom right corner of your Chromebook.
How to Disable Chromebook Accessibility Features
You can easily enable and disable accessibility features through the system menu. This is important as some accessibility features are annoying to have enabled all the time.
As a technology trainer, I frequently turn features like dictation and highlight mouse cursor on and off throughout the day.
Just click the system menu (bottom right corner of your Chromebook, where you typically log out), select "accessibility" and select the feature you want to enable or disable.
Features that are enabled are identified with a green check mark.
Adjust your accessibility settings in the Google Admin console to avoid problems
Chromebook accessibility features are "device sticky" by default. This can cause problems in a classroom setting.
Here is a very common situation:
- Student A uses a Chromebook during first period and turns an accessibility feature on
- Student B uses the same Chromebook during second period and discovers that the accessibility features are still enabled.
In a school setting where Chromebooks are shared by many different students, you want accessibility settings to be connected to a student account, not the device.
When accessibility settings are "device sticky" problems can occur!
Middle school students find it entertaining to turn on the more annoying accessibility settings (like ChromeVox) right before they sign out of the device.
The next student who signs into the Chromebook is startled when their Chromebook starts talking to them!
To avoid this frustrating situation I recommend that district administrators check a single, important box inside of the Google Admin console: "Turn off accessibility setting on sign-in screen upon logout."
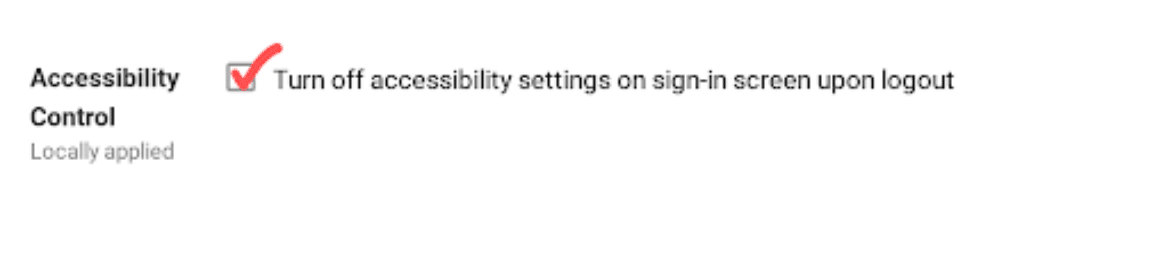
Admin Console Path: Device management > Chrome > Device Settings > Sign In Settings > Accessibility Control
Checking this box will disable any enabled accessibility when user signs out of a Chromebook.
Enabling this setting will not prevent a student from using accessibility features when they are signed in, but those changes won't impact other students who use the same device.
▶ Note: to make this change you will need access to the Google Admin console.
Now that we have those important setup notes out of the way, let's dive into each Google Accessibility feature and consider how we can use it in the classroom.
ChromeVox (Spoken Feedback)
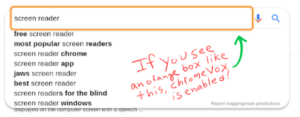
ChromeVox is a screen reader for blind users that allows them to navigate the web through verbal prompts.
When enabled, ChromeVox places an orange box around selected objects and reads the on-screen text.
Of all of the accessibility features on a Chromebook, ChromeVox is the most extreme and the one you are least likely to use.
If you are blind, ChromeVox is capable screen reader. If you are not blind ChromeVox is incredibly annoying!
One of the top accessibility related searches on Google is "How to get rid of the orange box on Chromebook." This feature frequently gets turned on accidentally and can be quite startling and frustrating if you don't know how to disable it!
▶ To disable ChromeVox, click on the system menu of your Chromebook, select accessibility features, and remove the green checkmark by clicking "ChromeVox".
While it might be the first feature listed in the Chromebook accessibility menu, ChromeVox spoken feedback is designed for a very specific disability. Unless you have a blind student in your classroom, you can turn off Chromevox.
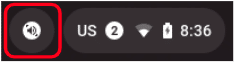
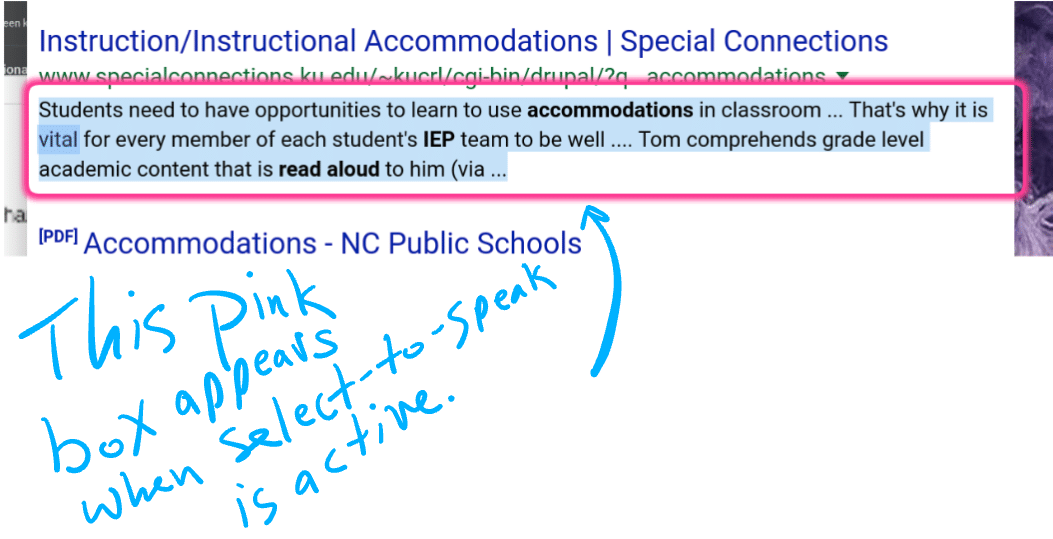
Select-to-Speak (Text to Speech for Chromebooks)
Select to speak is a Chromebook reader that can read most on-screen text!
While similar to ChromeVox, select-to-speak doesn't activate unless a student requests it. This makes it a more useful classroom accessibility feature for students who would benefit from having text read aloud, but don't need it all the time.
First, you will need to enable select-to-speak from the accessibility system menu on your Chromebook.
Once enabled you will see a new icon appear on the shelf (the black bar at the bottom of your Chromebook).
You can enable select to speak in two ways:
- Press the speaker icon on the Chrome Shelf and then drag to select the text you want read.
- Highlight some text on your screen and press search + s
Select-to-speak works on MOST websites including:
- Google Docs
- Google Forms
- Google Slides
- PDFs (most, not all)
Select to speak can help you meet one of the most common accommodations listed in IEPs – having text read aloud. It even works in Google Forms during a locked quiz!
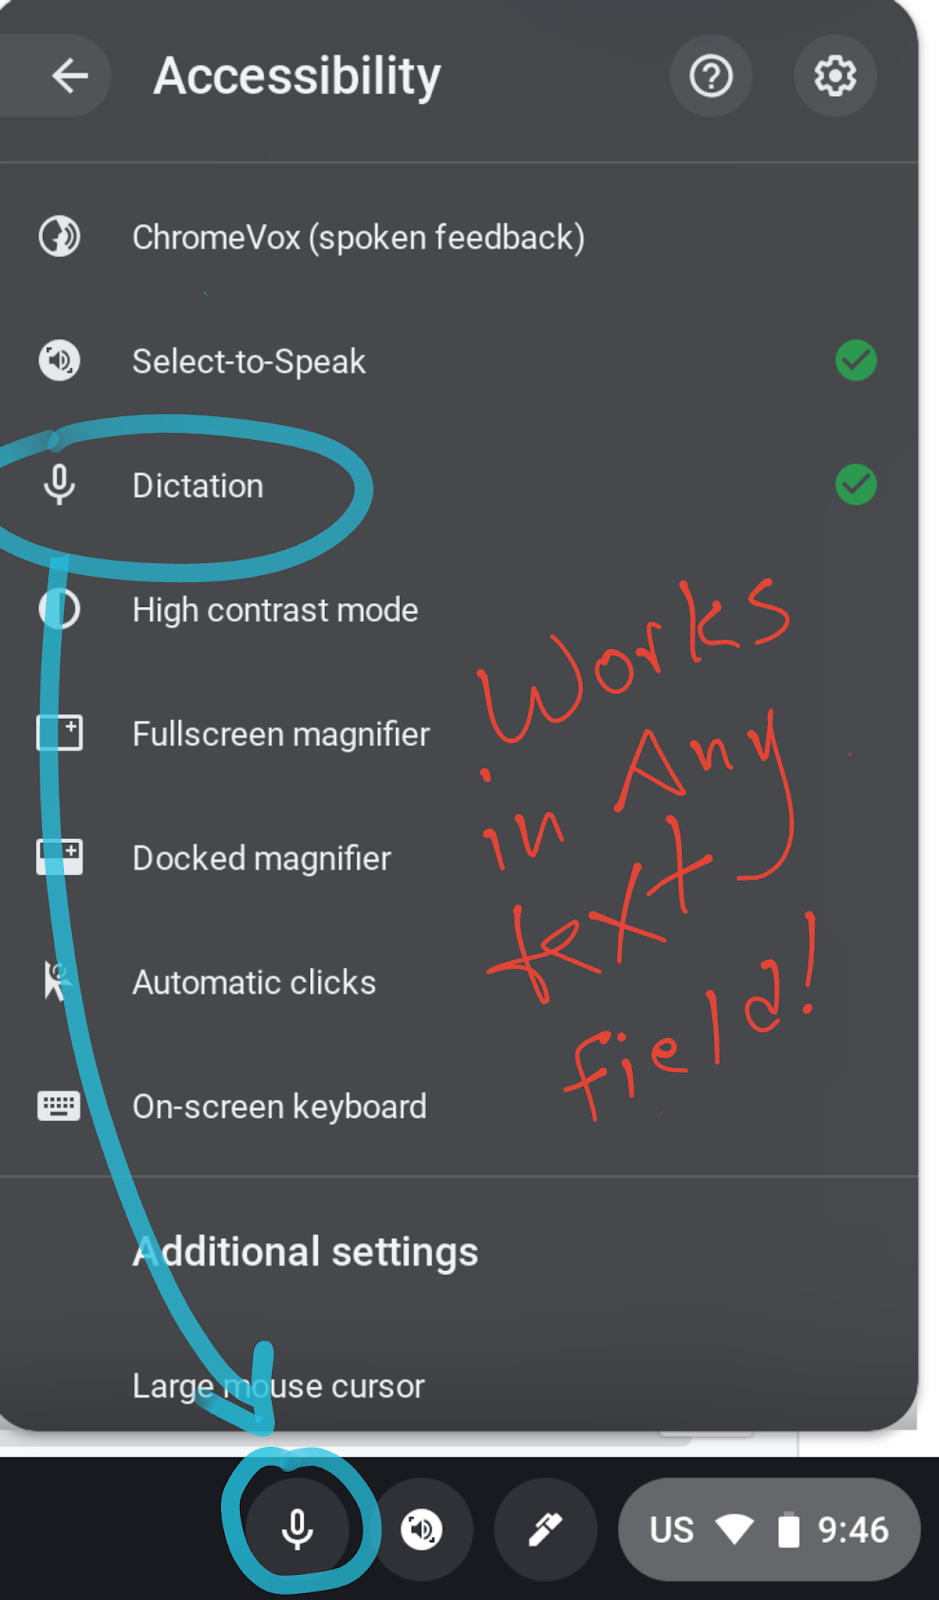
 Dictation
The Dictation feature (Chromebook voice typing) is the newest addition to the accessibility lineup…And it's awesome!
Most adult smartphone users will be familiar with the concept of voice typing. This feature is now available on all Chromebooks!
Voice typing is awesome for students who are slow typers, poor spellers, or need some extra help getting their thoughts "on paper."
First, you will need to make sure that dictation is enabled through the Chromebook accessibility menu.
Once you've done that, you will see a microphone icon appear on the shelf, right next to the select-to-speak icon.
Click it to enable Google voice typing on your Chromebook!
I am typing this sentence right now using the dictation to text feature! You can even add punctuation by saying "period," "exclamation point" or "question mark."
▶ You can activate voice typing by using the keyboard shortcut Search + d
The dictation feature will work in any text field, including Google Docs, Slides, Drawing, etc.
Once you show this to your students and fellow teachers they will want to know how to turn on Google voice typing too!
You can enable voice typing in two ways:
- Click in a text field and then press the mic icon on the Chrome Shelf. Once you hear a soft "chirp", begin talking.
- Click in a text field and press search + d
▶ Note: Google Docs and Slides also have a feature called "voice typing" however the dictation accessibility feature is far more flexible and will work in more places. Give it a try!
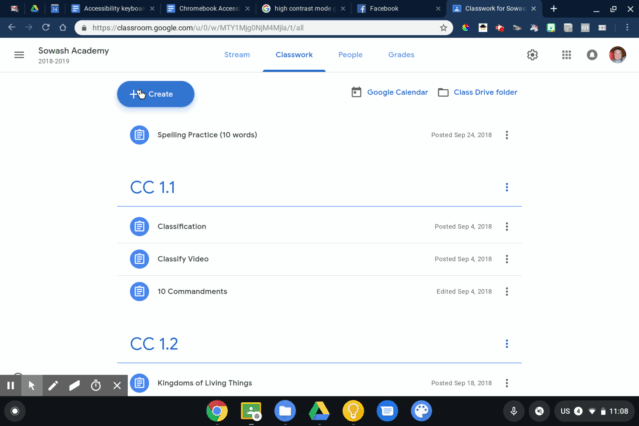
High contrast mode
High contrast mode is a Chromebook accessibility for visually impaired users.
Some students who are sensitive to bright lights may also benefit from enabling high contrast mode.
Some teachers have complained that the "white" look of Google classroom is difficult for students to read and causes increased eye strain.
While you can't adjust the theme of Google Classroom, turning on high-contrast mode might help.
This picture illustrates what Google Classroom looks like with high-contrast mode turned on.
▶ You can activate high contrast using the keyboard shortcut Search + ctrl + h
Fullscreen magnifier
This is another feature for users with visual impairments, but it also happens to be a feature I rely on every day!
Fullscreen magnifier is typically used to enlarge a portion of the screen for easier reading or to reduce screen clutter, helping students who are easily distracted focus on a specific task.
It can also be used by technology teachers who want to emphasize an element of the Chrome browser during a live demo.
This is a marvelous feature that I use as a presenter every day.
Enable full-screen magnifier in the accessibility menu. When you do this, your screen will zoom in a little bit.
Press and hold ctrl + alt while "scrolling" with two fingers on the trackpad. This will zoom the screen in / or out based on your scroll direction.
▶ To unzoom a Chromebook screen, hold the ctrl + alt key and "scroll" out with your fingers, or disable screen zoom from the Chromebook accessibility menu.
It's a bit tough to explain this in words. Watch the video embedded below for a visual guide to using the screen zoom feature.
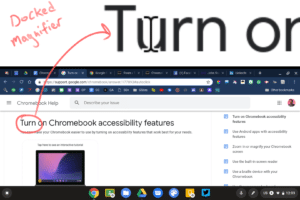
Docked magnifier
Docked magnifier is a variation of the fullscreen magnifier. When enabled, the top third of your screen shows a highly enlarged portion of the bottom 2/3 of your screen.
A lot of people accidentally enable this feature and it can be pretty annoying if you don't want it! To unzoom your Chromebook screen, click on accessibility and uncheck docked magnifier.
The docked magnifier may also be useful for graphic design projects if you need to precisely align objects or look at something down to the nearest pixel.
If you visit the accessibilities settings you can adjust the zoom magnification from 4x-20x.

You can activate the docked magnifier by using the keyboard shortcut ctrl + search + d
Automatic clicks
Whoever named this feature did a great job! When enabled, blue and green circles will appear around your mouse. When the green circle is complete, a click is enabled.
This feature is helpful for individuals who are unable to use both hands or for younger students who struggle to click effectively.
On-screen keyboard
It might come as a surprise that the Chromebook, a device that has a physical keyboard, also has an on-screen keyboard. This is the same experience that you have on your phone or tablet.
The on-screen keyboard is frequently used by individuals who use eye-tracking software to navigate their device. It is also activated if you have a Chromebook that converts into a tablet.
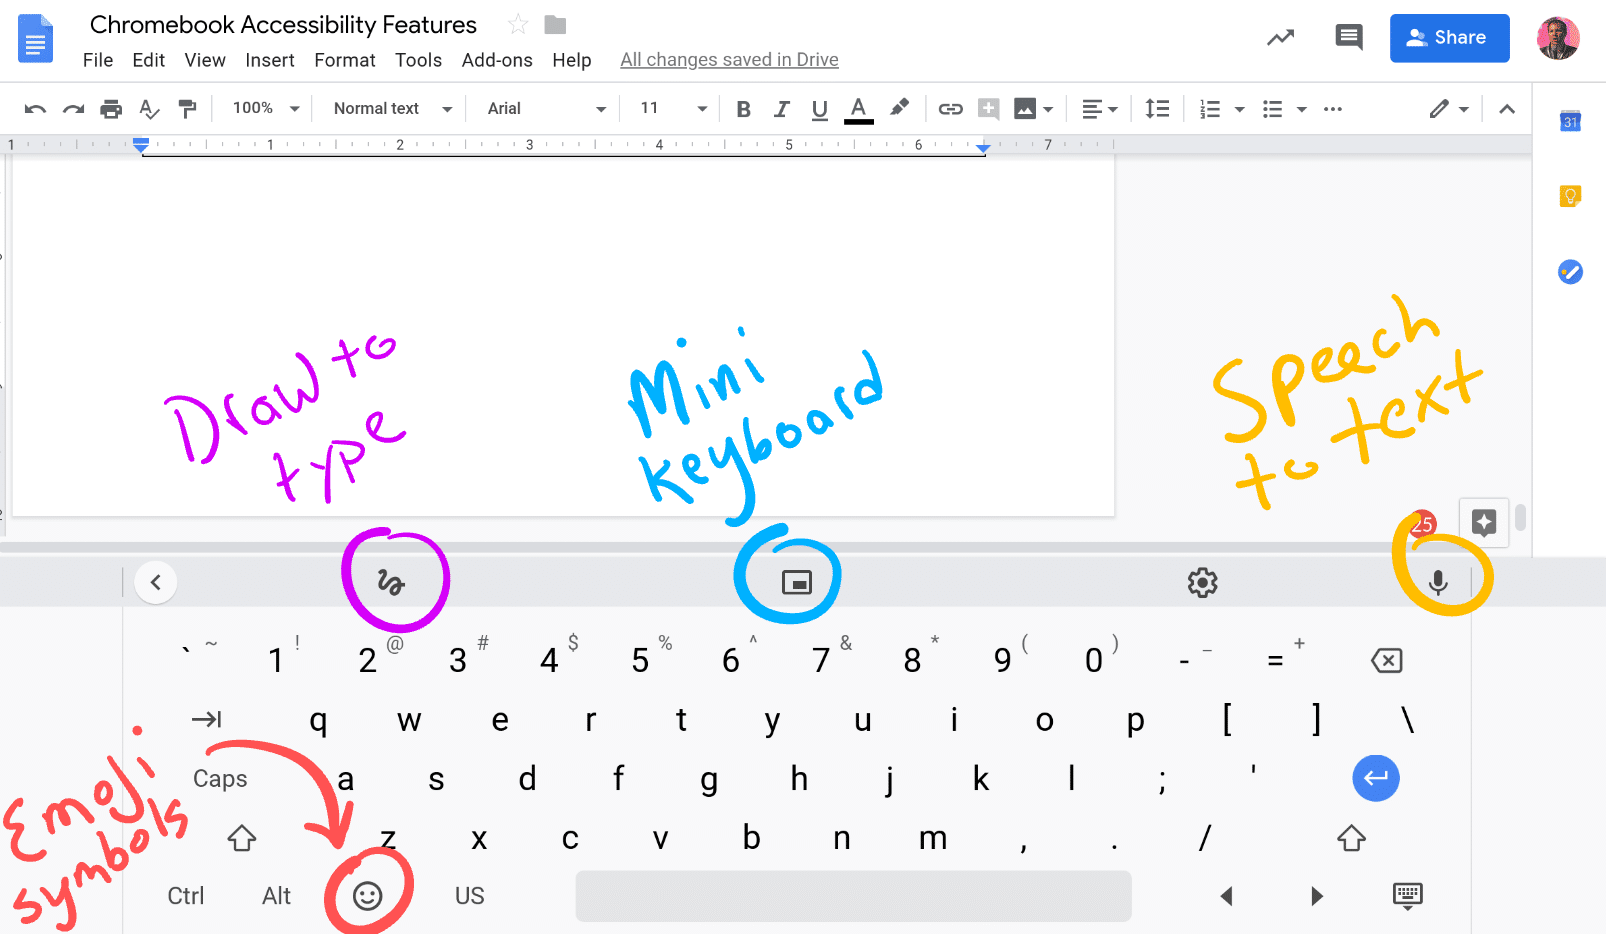
At first glance, the on-screen keyboard is pretty normal. But if you take a closer look, there are some pretty neat features you can't find anywhere else!
Draw to Type – click the squiggly line on the keyboard and you can draw to type! This could be an amazing way to help elementary students practice their writing skills!
Emoji Keyboard – just like your phone, the Chromebook on-screen keyboard give you access to hundreds of emoji characters!
Dictation – The speech-to-text feature is baked right into the on-screen keyboard, making it easy to write, type, or speak your content onto the screen.
Mini Keyboard – this is actually pretty useful. You can "pop out" the on-screen keyboard into a mini screen that floats on top of your other windows. This is convenient if you only need the keyboard for emoji or special math symbols.
If the on screen keyboard keeps popping up, it can be super annoying. To hide the on-screen keyboard you will need to disable it from the accessibility menu on your Chromebook.
- Click the Chrome settings menu (three dots in the upper right corner)
- Click on settings
- Search for "accessibility" from the settings menu
- Open up the accessibility settings and look for "on-screen keyboard"
- Slide the switch to disable the on screen keyboard for Google Chrome
Mouse Pointer Accessibility Features
Ever lose your mouse cursor on the screen? It happens.
Individuals with low vision or younger students who are still learning to navigate their Chromebook can benefit from a selection of mouse cursor accessibility features:
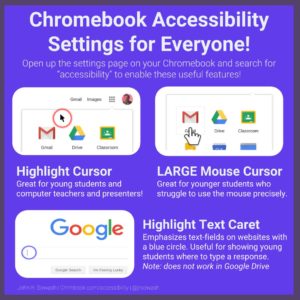
Large mouse cursor
Enlarges the mouse cursor for increased visibility. This is helpful for young students who struggle to click precisely.
Highlight Text Caret
When enabled, this feature identifies text fields with a blue circle; A good option for students who lose the cursor on a web page.
Highlight object with Keyboard Focus
This feature is very similar to highlight text caret, but instead of emphasizing the mouse cursor, it highlights the entire text field with an orange box, similar to ChromeVox.
Note: Highlight text caret and keyboard focus do not work in Google Docs or Slides.
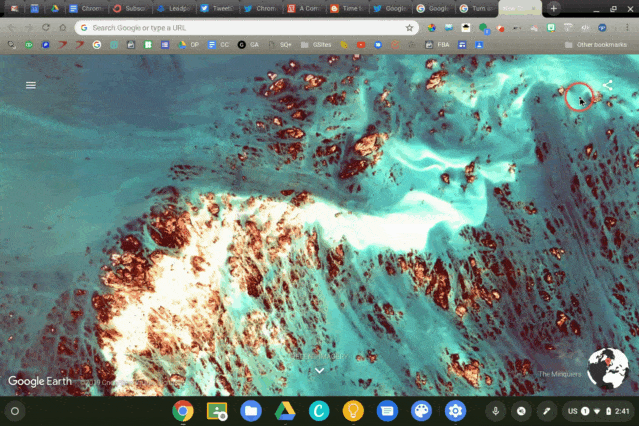
Highlight mouse cursor
When enabled a red circle appears around the mouse pointer at all times. This is an alternative to the large mouse cursor and can be helpful for students who frequently lose the pointer on the page.
This is a great feature for computer teachers and technology trainers. I enable highlight mouse cursor when I am leading Chromebook workshops. It's a lot easier to see from the back row when you can follow the red circle!
▶ To get rid of the red circle around your cursor, visit the settings page for your Chromebook, and look for "highlight mouse cursor." Disable it and the red circle will disappear!
Mono audio
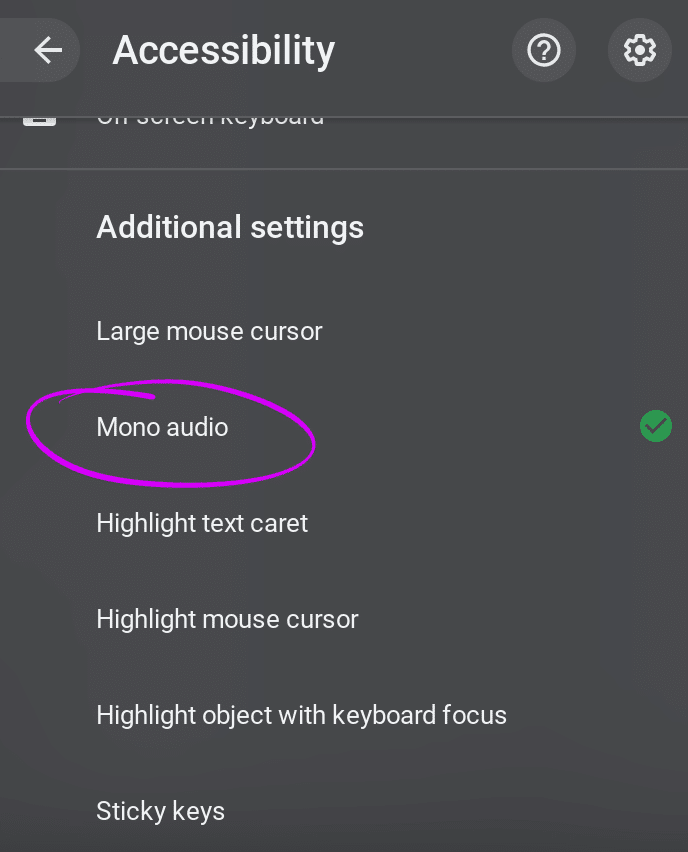
Most audio recordings (music, podcasts, YouTube videos, etc) are recorded with stereo audio which means there are slightly different sounds coming from the left and right speakers on your Chromebook. If you have headphones in, take one out and you can hear the different channels.
Audio recorded in stereo can be a problem for individuals who are deaf in one ear as they only hear one part of the recording.
Enabling mono audio on your Chromebook forces audio to play the same sounds from both the left and right channels so you won't miss a thing.
You can hear the difference by listening to a song on Spotify and flipping the mono audio setting on and off a few times.
Sticky keys
Typing requires a lot of coordination! There are roughly 100 keys on a traditional keyboard, but because of various keyboard combinations, those 100 keys can be combined to make thousands of combinations when pressing the shift, control, or alt keys.
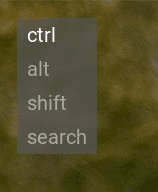
What do sticky keys do? This feature was developed for individuals who have difficulty pressing multiple keys simultaneously. When enabled, ctrl, alt, shift, and search become "sticky" so that you don't need to press two keys at the same time.
This is a useful feature for students with physical impairments that prevent the use of both hands (i.e. a student who breaks an arm) or young students who are still developing their fine motor skills.
When sticky keys are enabled, a transparent notification will appear in the top left corner of your screen if you press the ctrl, shift, alt or search keys.
Wrapping Up
Even though I would consider myself a Chromebook expert, (hey, I WROTE the book on Chromebook!?) I have learned so much by researching this post.
My primary takeaway is that accessibility features are NOT just for individuals with special needs. Many of these features I have begun using on a regular basis (highlight mouse cursor, dictation, and screen zoom are my favorites!).
But here's the thing. For me, these accessibility features are a nice BONUS that makes my life easier. For individuals who have disabilities, these features are essential.
"For people without disabilities, technology makes things easier. For people with disabilities, technology makes things possible." – IBM Training Manual 1991
Every teacher has a responsibility to develop a basic understanding of the features and controls that can open opportunity for students with special needs. That goes for iPads, PCs, and Chromebooks; whatever device you use in your classroom. I hope this detailed overview of Chromebook accessibility features will help you support the learners in your classroom!
Contributors: I wish to thank Robin Pegg (@RSPegg), Jeff Crocket (@jeffcrockett8), and Karen Chichester (@kchichester) for reviewing and contributing to this post.
Source: https://www.chrmbook.com/chromebook-accessibility/
Post a Comment for "Why Is There a Blue and Green Circle on My Samsung Chromebook Screen"